Welcome to Starfish
Starfish gives you a convenient way to keep track of your students – raising kudos for a job well done, raising flags when there is a concerning pattern of behavior, making referrals when needed and ensuring students and Navigators are aware of your concerns.
Getting started is easy! Starfish will automatically display all students enrolled in your courses.
Follow the text below to access Starfish:
Setup your Profile
Some of your profile, such as your contact information, is imported from your LMS or SIS. You have the ability to edit other parts of your profile, such as your biography.
STEP 1
Click on your name in the Top Navigation bar and select the Institutional Profile tab. 
STEP 2
Edit your Phone and add an Alternate Email address if you would like Starfish to send email to an address in addition to your institution email.Select the Both radio button to receive email at both accounts.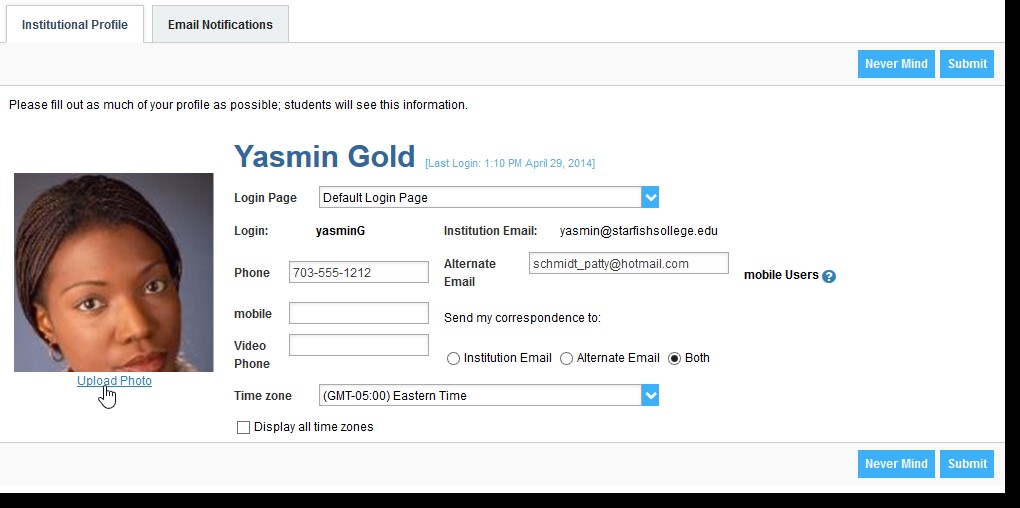
STEP 3
Double check that the Time zone selected matches your time zone. This time zone will be used when including appointment times in emails from Starfish.
STEP 4
Help students put a face to your name by clicking the Upload Photo link beneath the existing photo or photo placeholder.Browse to a photo file (.jpg, .png, or .gif), and then click the Upload Now button to update your photo.
STEP 5
Click the Submit button to save your changes.
Notes:
You may find the following Starfish Two Minute Tips helpful:
Raise a Flag on your students
When you have a concern with a particular student, raise a flag, to-do, or referral to communicate your observations. The appropriate individuals will be automatically notified when you save the item.
STEP 1
Click on the Students navigation item to see your list of students.
STEP 2
Find the desired student by typing the name into the Search box.
STEP 3
Click on the student’s name to bring up the Student Folder.
STEP 4
Click the Flag button.
A list of flags that you have permission to raise on this student is displayed.
STEP 5
Select the desired Flag from the list.
STEP 6
If relevant, select a course from the Course Context, drop down list, and enter notes in the Comment box.
STEP 7
Click the Save button.
Notes:
The Student View: indicates whether the student can view the flag and the notes you include in the Comment box.
The Permissions area lists roles that have permission to view the selected flag and the notes you include in the Comment box.
Clearing a Flag on your students
STEP 1
Click on the Students navigation item to see your list of students.
STEP 2
Find the desired student by typing the name into the Search box.
STEP 3
Click on the student’s name to bring up the Student Folder.
STEP 4
Click on Tracking in the left navigation list to view active flags.
A list of flags raised on this student will display.
STEP 5
Select the desired Flag icon next to the corresponding flag’s item name from the list.
STEP 6
Click the Clear button.
STEP 7
Select a Reason for clearing the flag.
STEP 8
Add a Comment if applicable.
STEP 9
Click the Submit button.
Best Practices: Raising Flags
- Communicate concerns with students prior to raising a flag so they are aware of issues affecting their success in the course.
- Raise flags as soon as there is a concern so Navigators can intervene and try to help get students back on track before it is too late in the semester.
- There are two types of flags – Use the correct version to help communicate expectations most effectively.
- Notification Only – Use for notification only purposes to initiate early intervention process.
- Action Required Flags – Use for specific recommended actions for Navigator to share with student to help improve concerns. Include clear expectations or recommendations in your comments regarding specific action you are requesting from the student and Navigator in response to your flag.
- Set clear expectations or recommendations in your comments regarding specific action you are requesting from the student and navigator in response to your flag.
- Adding comments to the flag helps the Navigator and student understand the concern.
- Comments entered on a flag are included in the email notification sent to students and is a permanent part of their educational record.
- Students are automatically emailed a copy of the flag notification immediately after a flag is raised.
- Students can request academic records at any time. Therefore, this information can potentially become public.
- Raising multiple flags on the same student for the same issue:
- Can be ineffective and desensitize the student. Can also be cumbersome for Navigators with an average of 250 students assigned to them.
- Before raising a flag multiple times on a student, attempt to have a conversation with the student or with the Navigator to discuss the situation and improvements the student can make in your class.
- Utilize Navigators as partners for collaboration in student success:
- Follow up with Navigators about issues if you do not feel it is resolved.
- Identify and adjust strategies to meet the student’s needs.
- Brainstorm improvement plans and interventions together.
Best Practices: Making Referrals
- Students do not receive email notifications on referrals related to confidential or personal matters such as the Disability Resource Center or counseling. (Refer to flag handout)
- Any comments entered on a referral in Starfish are permanent and part of the student’s educational record. Although students may not receive notification of a referral, they still have a right to request them as part of their educational record.
- Referrals should be made for confidential, sensitive issues or when you feel a student could benefit from receiving campus or community resources.
Best Practices: Canvas and Starfish
- Canvas “talks” (integrates data) to Starfish. Grades and due dates listed in Canvas are fed into Starfish each night. This information is incredibly helpful for Navigators as they attempt to work with students and help them be successful.
- Keep grades as up to date as possible.
- Provide accurate due dates for assignments.